The Step-by-Step Process to Sealcoat a Parking Lot
Sealcoating is one of the most important steps in maintaining and extending the life of an asphalt parking lot. This process involves applying a protective coating to the surface of the pavement, which helps shield it from damage caused by weather, traffic, and other environmental factors. Not only does sealcoating improve the appearance of your parking lot by giving it a fresh, dark finish, but it also prevents costly repairs down the road. Here’s a detailed look at the step-by-step process to sealcoat a parking lot and why it’s essential for long-term pavement health.
1. Inspection and Evaluation
Before starting the sealcoating process, the first step is to thoroughly inspect the parking lot to assess its condition. During this inspection, any existing damage—such as cracks, potholes, oil stains, and drainage issues—will be identified. It’s crucial to address these issues before applying the sealcoat because a smooth, even surface is needed for the coating to adhere properly.
2. Cleaning the Surface
Once the inspection is complete, the parking lot needs to be thoroughly cleaned. Dirt, debris, and loose gravel must be removed to ensure the sealcoat can bond effectively to the asphalt surface. This step typically involves:
- Sweeping: A heavy-duty broom or power sweeper is used to remove dirt, leaves, and other debris.
- Blowing: High-powered blowers are often used to clear out hard-to-reach areas and ensure the lot is free from dust and debris.
- Pressure Washing: Oil stains, chemicals, and any other residue that might prevent the sealcoat from adhering are removed using a pressure washer. Oil stains are particularly problematic as they can cause the sealcoat to fail if not properly cleaned.
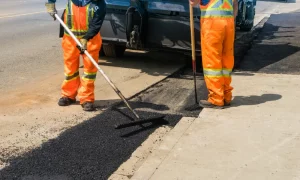
3. Repairing Cracks and Potholes
Before applying the sealcoat, any cracks, potholes, or other pavement defects need to be repaired:
- Crack Filling: For cracks that are less than 1/2 inch wide, crackfilling is used. A hot or cold rubberized crack filler is applied to seal the cracks and prevent water infiltration, which can cause further damage.
- Pothole Repair: Larger areas of damage, like potholes, are typically repaired using patching materials. The damaged area is cleaned out, and new asphalt is applied and compacted to create a smooth surface.
Addressing these issues before sealcoating is essential, as the sealcoat cannot bridge gaps or repair deep structural issues on its own.
4. Edge Sealing
The edges of the parking lot and around any curbs or structures need to be sealed with care. A brush or squeegee is typically used to apply the sealcoat by hand around these areas to ensure even coverage and avoid overspray on sidewalks, buildings, or landscaping.
5. Mixing the Sealcoat Material
Sealcoating material, which typically consists of a mixture of asphalt emulsion, water, silica sand, and additives, needs to be properly mixed before application. The additives help enhance the sealcoat’s durability and resistance to weather and traffic. The mixture must be stirred thoroughly to ensure that the ingredients are evenly distributed for consistent application.
6. Applying the Sealcoat
The actual application of the sealcoat can be done using either a squeegee, brush, or spray system, depending on the size of the parking lot and the desired finish. There are generally two methods for applying sealcoat:
- Squeegee Application: A squeegee or brush is used to manually spread the sealcoat over the surface. This method is ideal for smaller areas or places that require precision, such as edges and corners.
- Spray Application: For larger parking lots, a pressurized sprayer is typically used to apply the sealcoat quickly and evenly across the surface. This method provides a smooth finish and is more efficient for big projects.
Typically, two coats of sealant are applied to ensure even coverage and maximum protection. The first coat is allowed to dry before the second coat is applied.
7. Allowing Time for Curing
Once the sealcoat is applied, it’s essential to allow the material time to dry and cure. The amount of time needed depends on weather conditions—warmer, sunny days typically result in faster drying times, while cooler or humid conditions may require more time. On average, it takes about 24-48 hours for the sealcoat to fully cure. During this time, the parking lot must remain closed to all traffic to ensure the coating sets properly and no damage occurs.
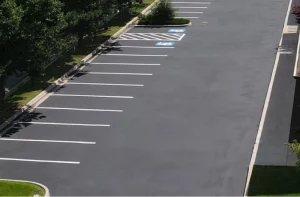
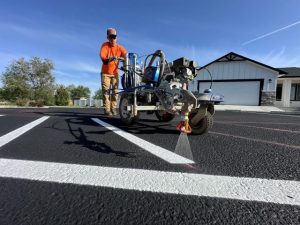
8. Re-striping the Parking Lot
After the sealcoat has cured, the parking lot needs to be re-striped. This involves repainting all lines and markings, such as parking spaces, arrows, handicap zones, and fire lanes. Clear, bright striping not only improves the visual appeal of the parking lot but also ensures proper traffic flow and compliance with safety regulations, such as ADA requirements.
9. Opening the Lot to Traffic
Once the sealcoat has cured and the striping is complete, the parking lot is ready to be opened to traffic. At this point, your lot will have a fresh, attractive appearance and will be protected against further wear and tear for the next few years.
The Benefits of Sealcoating Your Parking Lot
Sealcoating provides several important benefits:
- Prevents Water Damage: The sealcoat acts as a barrier, preventing water from seeping into the pavement and causing cracks or potholes.
- Protects Against UV Rays: Sun exposure can cause asphalt to dry out and become brittle, leading to cracking. Sealcoating protects against UV damage and oxidation.
- Enhances Appearance: Sealcoating gives your parking lot a fresh, clean, and smooth black surface, improving its curb appeal.
- Extends Pavement Lifespan: Regular sealcoating can extend the life of your asphalt pavement by several years, saving you from costly repairs or replacement.
- Reduces Maintenance Costs: By protecting the surface from damage, sealcoating helps you avoid expensive repairs and keeps your lot in good condition with minimal ongoing maintenance.